
What you need before you start
- A Mac with an active Dibur installation and microphone and accessibility permissions. This walkthrough covers Mac.
- An account with access to your chosen coding agent. Provider permissions and usage limits still apply.
- A local project you have permission to work on. Use a copy or a sample project for your first attempt.
Already have an agent? Start here
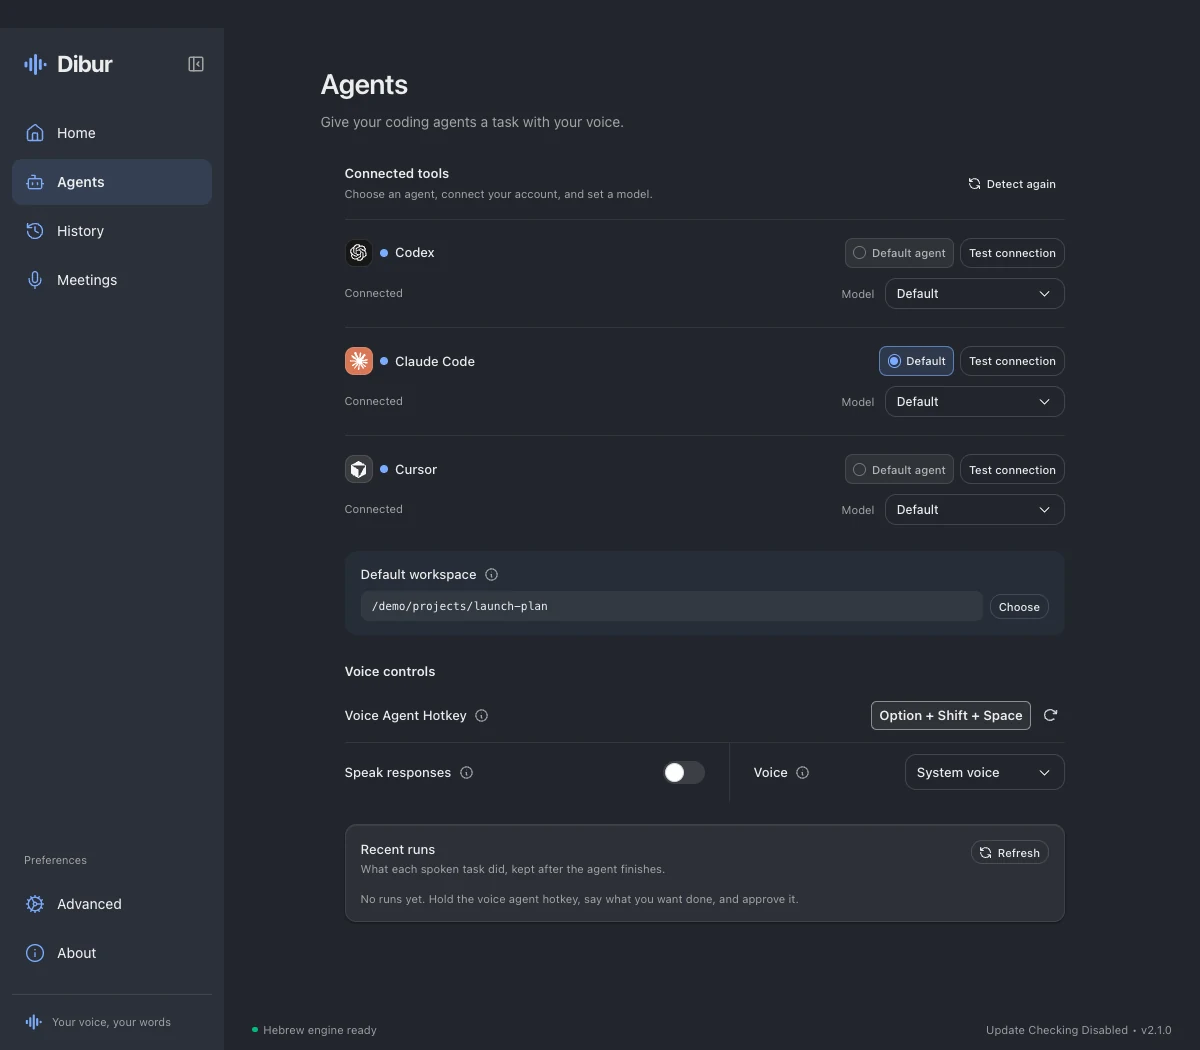
Open Dibur and select Agents in the sidebar. Find the tool you use. You only need one connected agent to get started.
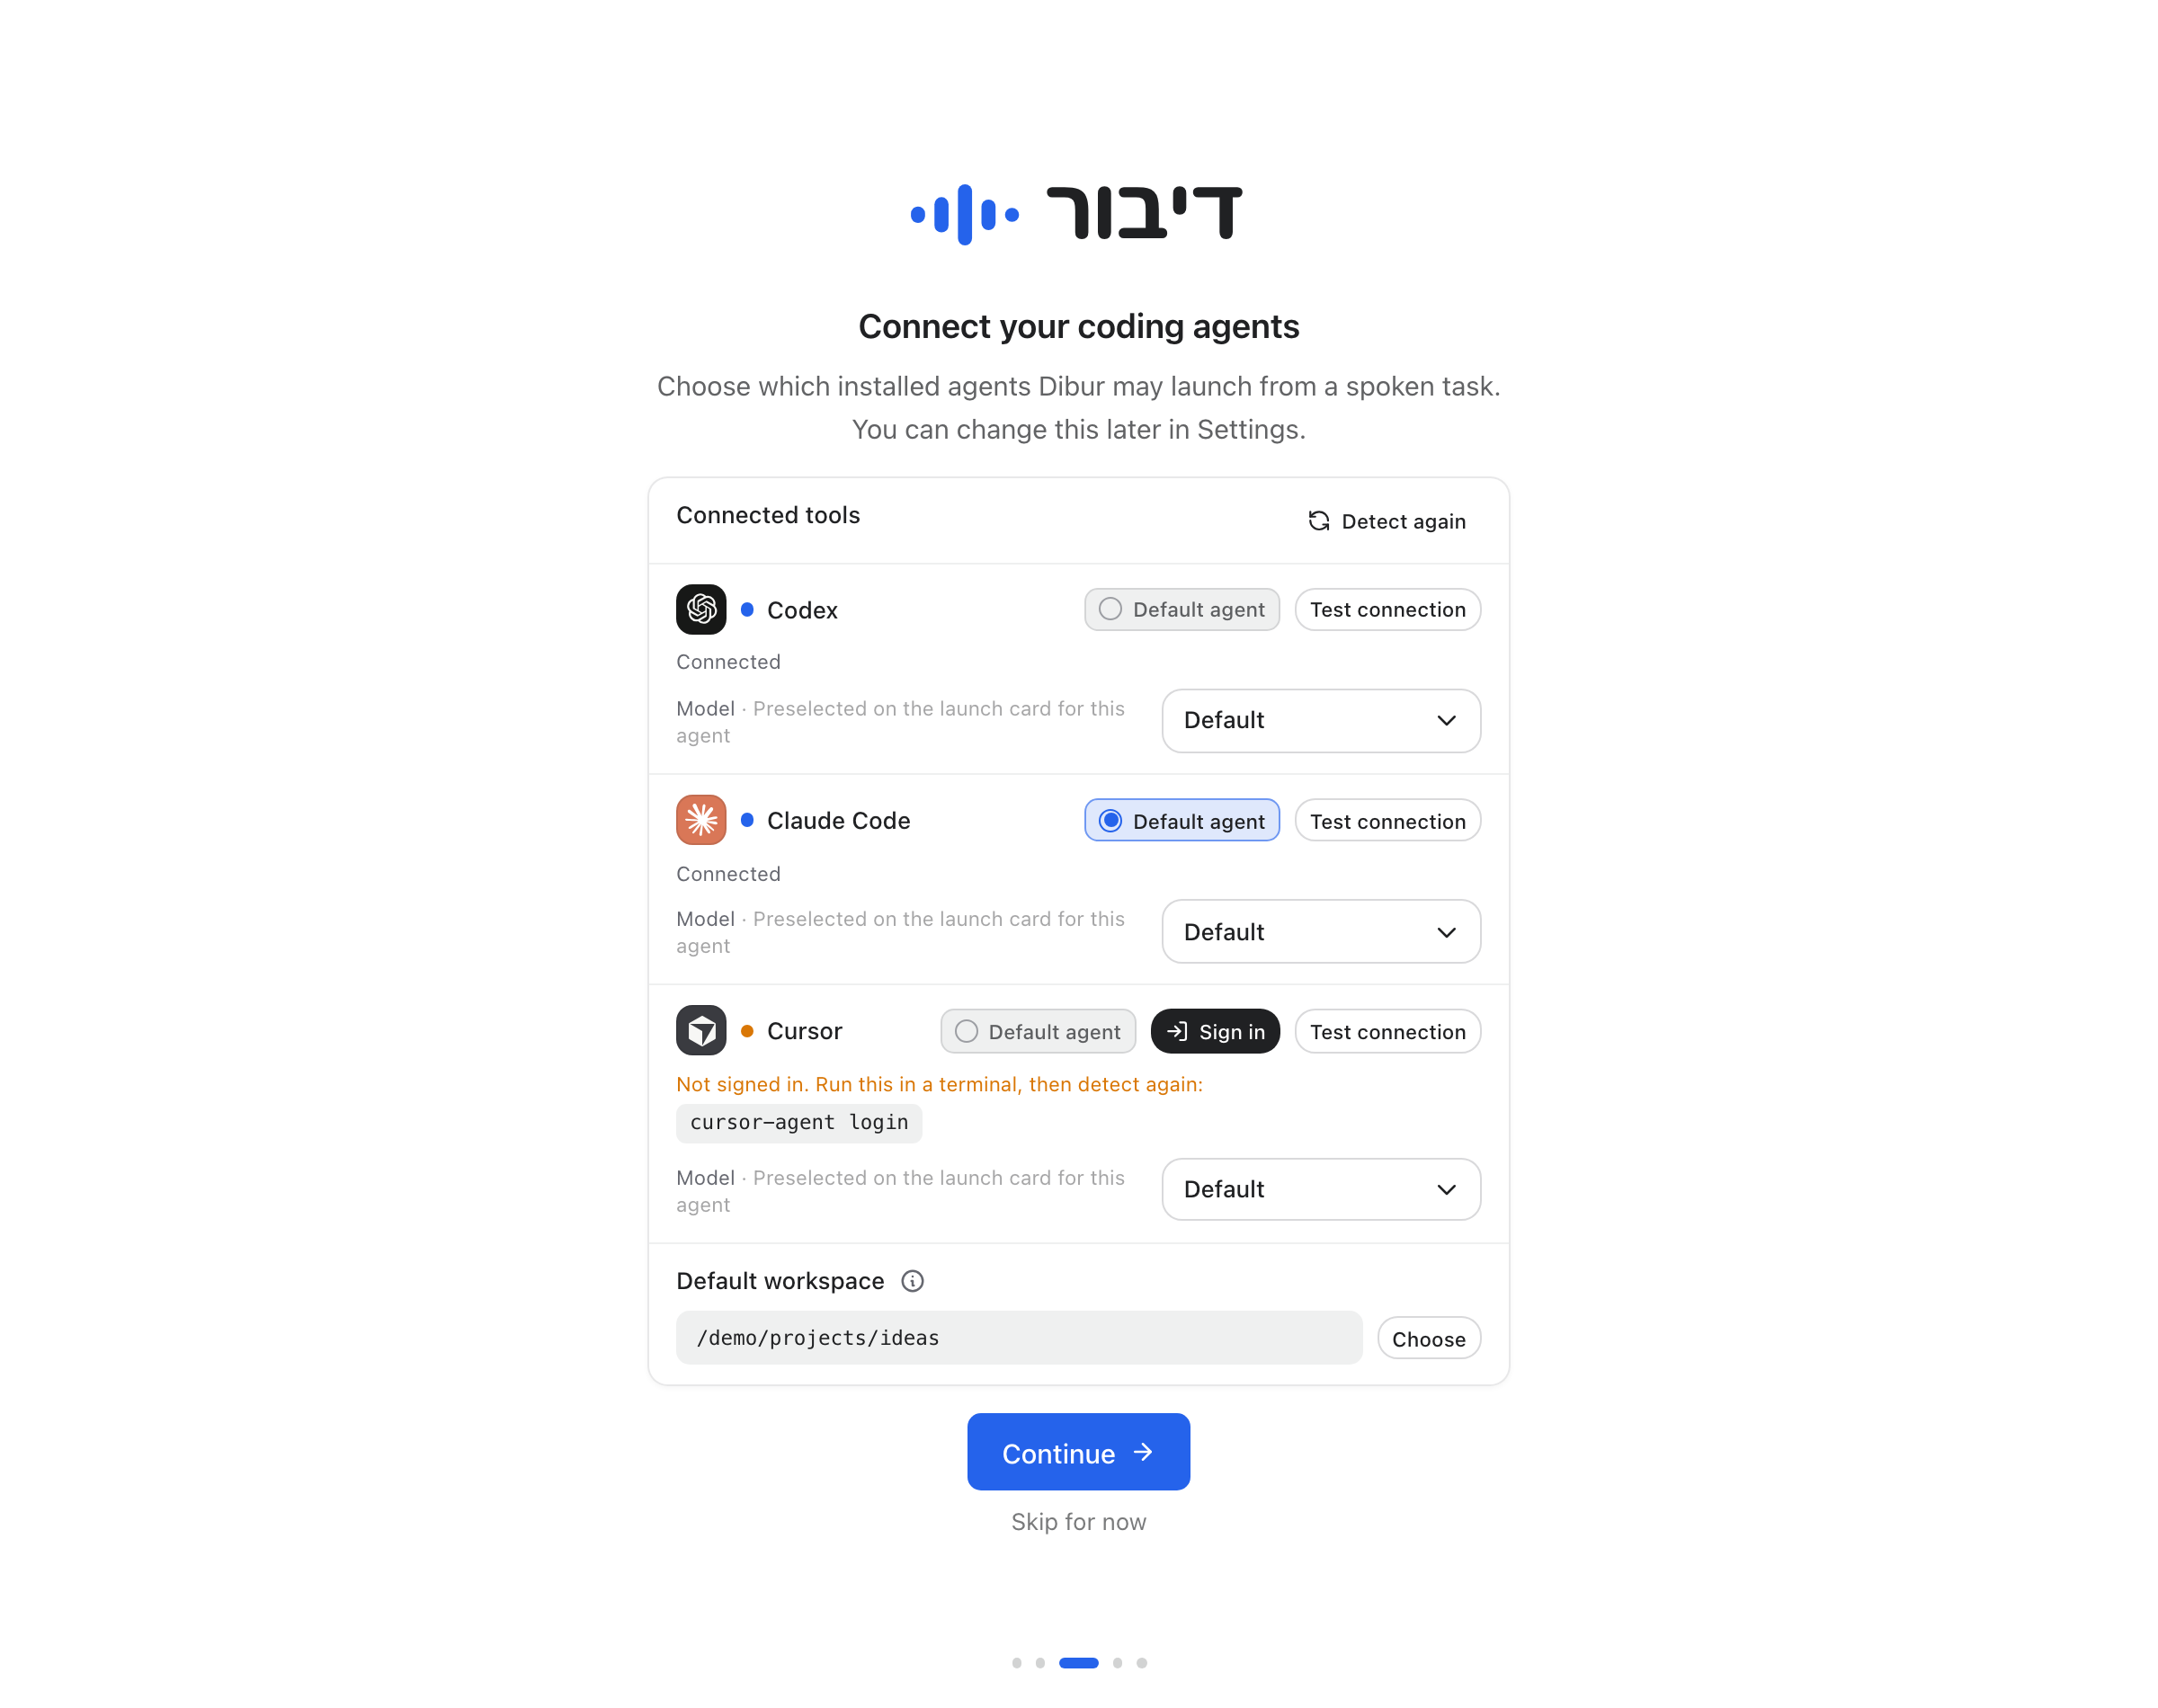
If its row says Connected, continue to choosing your project folder. If you see Sign in, click it and finish signing in in the browser that opens. If the row says Not installed, use Install to open that agent’s official installation page.
Dibur uses the agent’s command-line application, or CLI. This is a small program Dibur starts on your computer to receive your task. Having the Claude chat app, ChatGPT, or the Cursor editor does not by itself establish that the CLI is installed and signed in.
When an installation asks you to use Terminal
On Mac, press Command + Space, type Terminal, and open the application. Terminal is a window where you paste a command and press Return to run it. You do not need to learn programming to complete the setup.
Choose the macOS instructions on the official page. Run one command at a time and wait for it to finish. If an error appears, check the installation page’s troubleshooting before continuing. After a first installation, reopen Terminal to check that the command is available.
Connect Claude Code
Open the installation guide
Use the official link below and choose the Mac instructions. Skip installation if Claude Code already works in Terminal. Your Anthropic account must provide access to Claude Code.
Check that the command is available
Run claude --version in Terminal. A version number means the command was found. If it is missing, finish the official installation before trying to connect through Dibur.
Sign in
Back in Agents, click Detect again, then Sign in on the Claude Code row. Complete the browser flow yourself. If it does not open, run claude auth login in Terminal, complete sign-in, and return to Dibur.
claude --versionclaude auth loginConnect Codex
Install Codex CLI
Open OpenAI’s official CLI guide below and choose the Mac installer. The CLI is what Dibur looks for, even if you already use the Codex desktop app or an editor extension.
Connect your account
In Dibur, click Detect again and then Sign in on the Codex row. Complete the browser flow with the ChatGPT account you use for Codex. Use an account and workspace approved by your organization when applicable.
Use Terminal if sign-in does not open
Run codex login. When authentication finishes, return to Dibur and detect again. An organization may restrict sign-in methods or permitted workspaces; reinstalling the CLI will not remove those restrictions.
codex --versioncodex loginConnect Cursor
Install the CLI too
Open Cursor’s CLI installation page below. The editor and the command-line agent are separate components. Install the CLI even if your Cursor editor already works.
Finish browser sign-in
Click Detect again in Dibur, followed by Sign in on the Cursor row. Use your Cursor account in the browser. Dibur recognizes both the current agent command and the cursor-agent name used by some installations.
Use the command available on your computer
For a manual sign-in, current installations use agent login. If yours uses the older command name, run cursor-agent login. You do not need to rename files to match this guide.
agent loginagent statusChoose where the agent will work
Choose Default agent beside the tool you normally want to use. Open Agents, find Default workspace and click Choose folder. Select the folder containing your project files, rather than the agent’s application folder. In the updated interface you can also reach this choice through the agent preferences on Home.
Check the folder name before approving a task. An unconfigured default may point to your home directory, which is broader than a single project. You can change the agent, folder, and model on each launch card without changing your everyday defaults.
Test connection sends a short, real request to the agent. A successful result includes its reply and response time. This may count toward your account allowance, so there is no reason to repeat the test after a successful reply.
Send a small first request
Use the voice-agent shortcut
Check the configured voice-agent shortcut on the Agents screen. It is separate from ordinary dictation. Try: “Explain what this project does, without changing any files.”
Review the launch card
Read the transcript and check the agent, model, and workspace. Reject the request and try again if the words are wrong. Click Approve and run only when the request and folder are correct.
Read the result
In Dibur 2.1, completion shows a short summary line. Open the response to read headings, tables and code in a separate window. You can also revisit the run and reported actions from agent history. Before requesting file changes, keep a saved copy or another way to return to the previous state.
What the agent receives
Dibur transcribes speech locally. After approval, it passes the text to your chosen agent. That agent may send the request and project context to its model provider. A locally installed agent does not mean its AI processing happens offline.
An approved task can edit files and run commands. The launch approval is for the task; do not assume every internal action will ask again. If you choose Fish Audio for spoken responses, the final summary also goes to that service. System voice is available instead.
How to know it worked
- The agent says Connected, rather than showing only an installed version.
- The workspace is your selected project and the first request finishes with a response.
- The launch card shows your transcript before you click Approve and run.
Stuck? Start here
Installed, but Dibur says Not installed?
Check that the CLI command works in Terminal. A chat app or editor alone is insufficient. Finish the official installation, reopen Dibur, and click Detect again. For a custom installation location, contact support with the agent name and version.
The browser closed, but the connection did not change?
Click Detect again. If necessary, run the agent’s login command in Terminal and finish until it reports success. Never send passwords, login codes, or account files to support.
Sign-in status unknown?
The probe could not determine the result. Wait briefly and detect again. If the agent works in Terminal, try one connection test in Dibur and read the error before reinstalling.
Signed in, but the connection test fails?
Check your internet connection, provider availability, account allowance, and whether the workspace folder still exists. Successful authentication and a successful model request are different checks.
The shortcut types text instead of starting an agent?
You may be using the dictation shortcut. Check the voice-agent shortcut in Agents. A voice request should show the agent and workspace launch card before starting.
Sources and updates
Steps were checked against Dibur’s source and official documentation. Screenshots show the application with demonstration data and no personal information.